Managing Temporary Files
So you’ve followed the tips in the design section of this series, and you have a nicely laid out, organized filesystem. That’s great when you know where files should go. But what about when you download some files from the Internet or an email someone sent you, or you need to create a temporary document you know you can delete soon? You probably don’t want to deal with carefully filing these types of items, at least not right away. That’s why having a location for temporary files is a vital part of a filesystem you’ll actually keep organized.
You might call this an “inbox”, a “tempdir” (for temporary directory), a “dumping ground,” or whatever else you like. I’ll be boring and verbose and call it a “temporary location” here, but creativity in naming is encouraged. Mine is called Compostbin, because I once worked at a place that had a public location called Trashbin with a similar purpose, and I wanted a related name.
Here are some tips for designing and using this crucial part of an effectively organized filesystem.
Where to keep your temporary location
Many people have an ad-hoc temporary location on their desktop. If you like using your desktop, that’s fine, but keep in mind that a desktop used this way has a nasty tendency to turn into this:
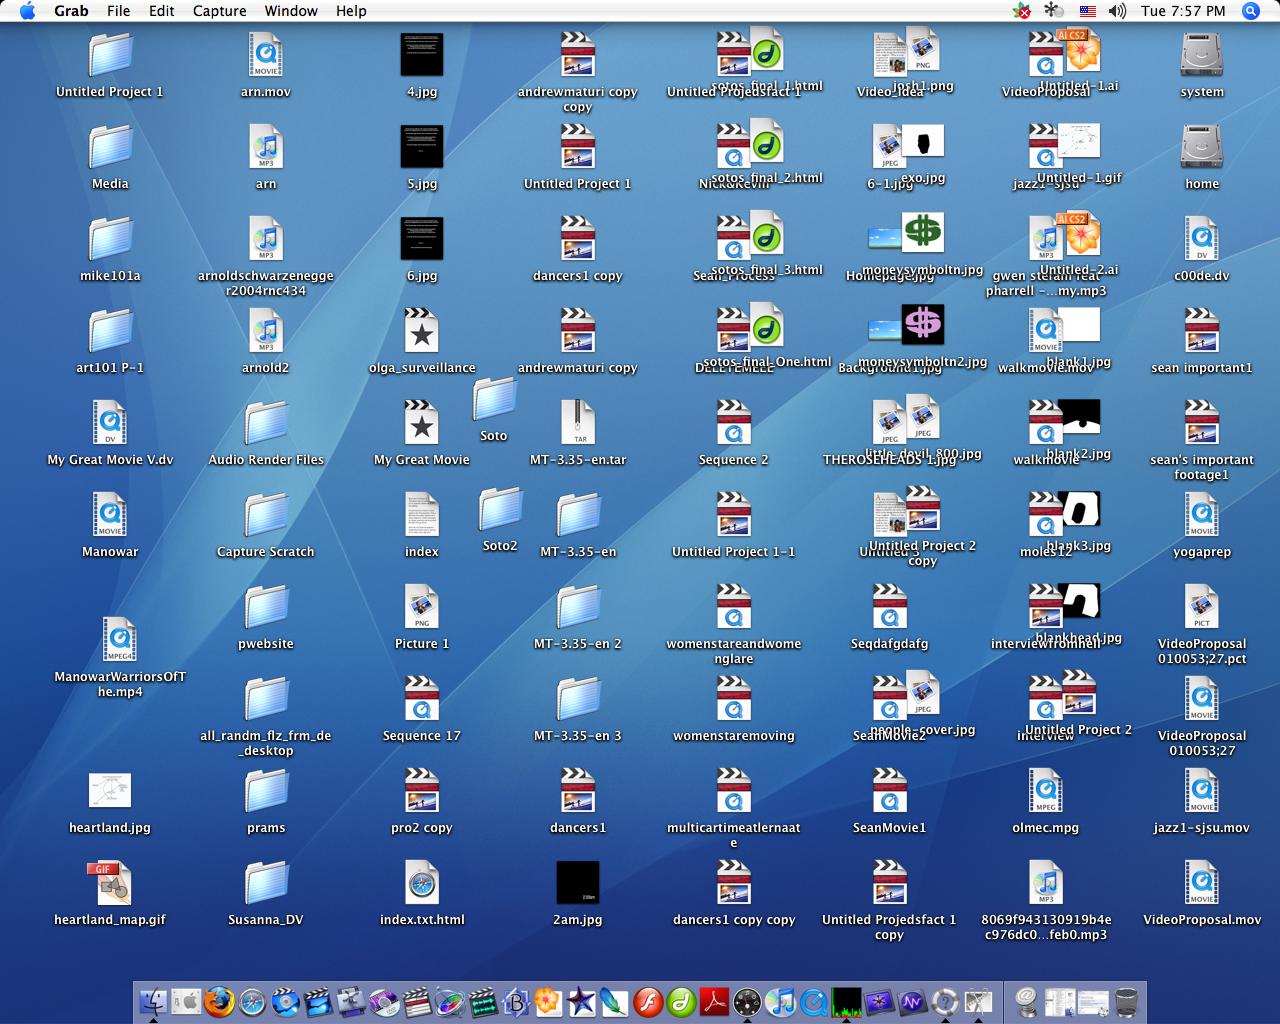 (Image credit: Michael Lowell, CC-BY)
Personally, I don’t keep anything on my desktop. My work computer has some shortcuts the system wouldn’t let me remove due to policies set by the company, so I even hid the desktop icons altogether (you can find this option in the View menu when you right-click on a Windows desktop). Call me fussy, but I find desktop clutter has a way of making a computer feel cramped and busy, and it serves as a constant, unwelcome reminder to you (and anyone you present a PowerPoint to) how much junk you’re in the middle of working on.
Tip: Also, don’t keep your porn on your desktop, especially if other people might be looking at your screen. Yes, I have seen someone who did this.
If you’ve always worked off your desktop, give putting your temporary location somewhere else a shot. If you don’t like it, you can always go back.
So if you don’t put it on your desktop, then where? Really, it can go pretty much anywhere – you just need to make it easy to get to using the tips in the next sections. If you have some faster storage and some slower storage (say, a solid-state drive and a spinning drive, or a local drive and a network drive), you may want to go for somewhere on the fast drive. Here are a couple of good choices if you don’t have any ideas right away:
- On Windows, right at the root of your
C:drive (e.g.,C:\Temp). This is easy to get to and quick to type, should you need to type it. - Right inside your
Documentsfolder, user folder, or home directory (e.g.,C:\Users\YourName\Documents\Temp,/Users/YourName/temp, or/home/YourName/temp). - Anywhere where it fits cleanly in the rest of your hierarchy.
Quickly accessing your temporary location
You’ll likely access your temporary location more often than any other folder on your computer, and if it’s hard to access you won’t use it, so you want at least one good way to access it rapidly. None of these methods are mutually exclusive – you can use as many of them as you find useful. And of course, these work for any folder you want to get at faster, not just your temporary location.
- Just put the folder somewhere easy to access.
If you choose
C:\Tempon your Windows computer, for instance, it’s not too hard to navigate to the C: drive and choose the folder. If you chooseD:\MyFiles\MySpecialFiles\MyFavoriteFolder\2019\January\Inbox, you’re going to be much more annoyed. - Put the folder somewhere that makes good sense to you, then create one or more links to it in locations that are easier to access. See the Designing with Links article in this series for details.
- Pin the folder to your file browser’s left pane. Both Windows Explorer and Finder support this – just drag and drop the folder to the “Favorites” or “Pinned” area (on certain versions of Mac OS, you must hold down the Command key while dragging the folder there, for some reason). Most Linux file browsers have a similar feature.
- If you drag and drop the folder to your taskbar or Dock on Windows or Mac OS, the folder will be pinned there for easy access. (On Windows, you right-click on the Windows Explorer icon to access pinned folders. On Mac OS, the folder just sits right on the Dock.)
- Put either the folder itself or a link to it on your desktop. I know I said I don’t like keeping things on the desktop, but if that’s the only thing on your desktop, I certainly won’t call you out for having a cluttered desktop!
- Finally, here’s an awesome trick for Windows users:
turn your temporary location into an environment variable
with a short name (mine is named
fc, for “Files: Compostbin”). You can access the value of an environment variable in a Windows path by typing its name surrounded by percent signs (e.g.,%fc%actually meansi:\fsroot\Compostbin, or whatever I say it means). Why does this help anything? Any time you get the familiar select-a-file window, your cursor starts out in the “filename” field. All you have to do to jump to your temporary location is type%fc%in the filename box and hit Enter – no looking around the screen and clicking. I find this to be one of the few pieces of Windows arcana that’s both great trivia and legitimately useful.
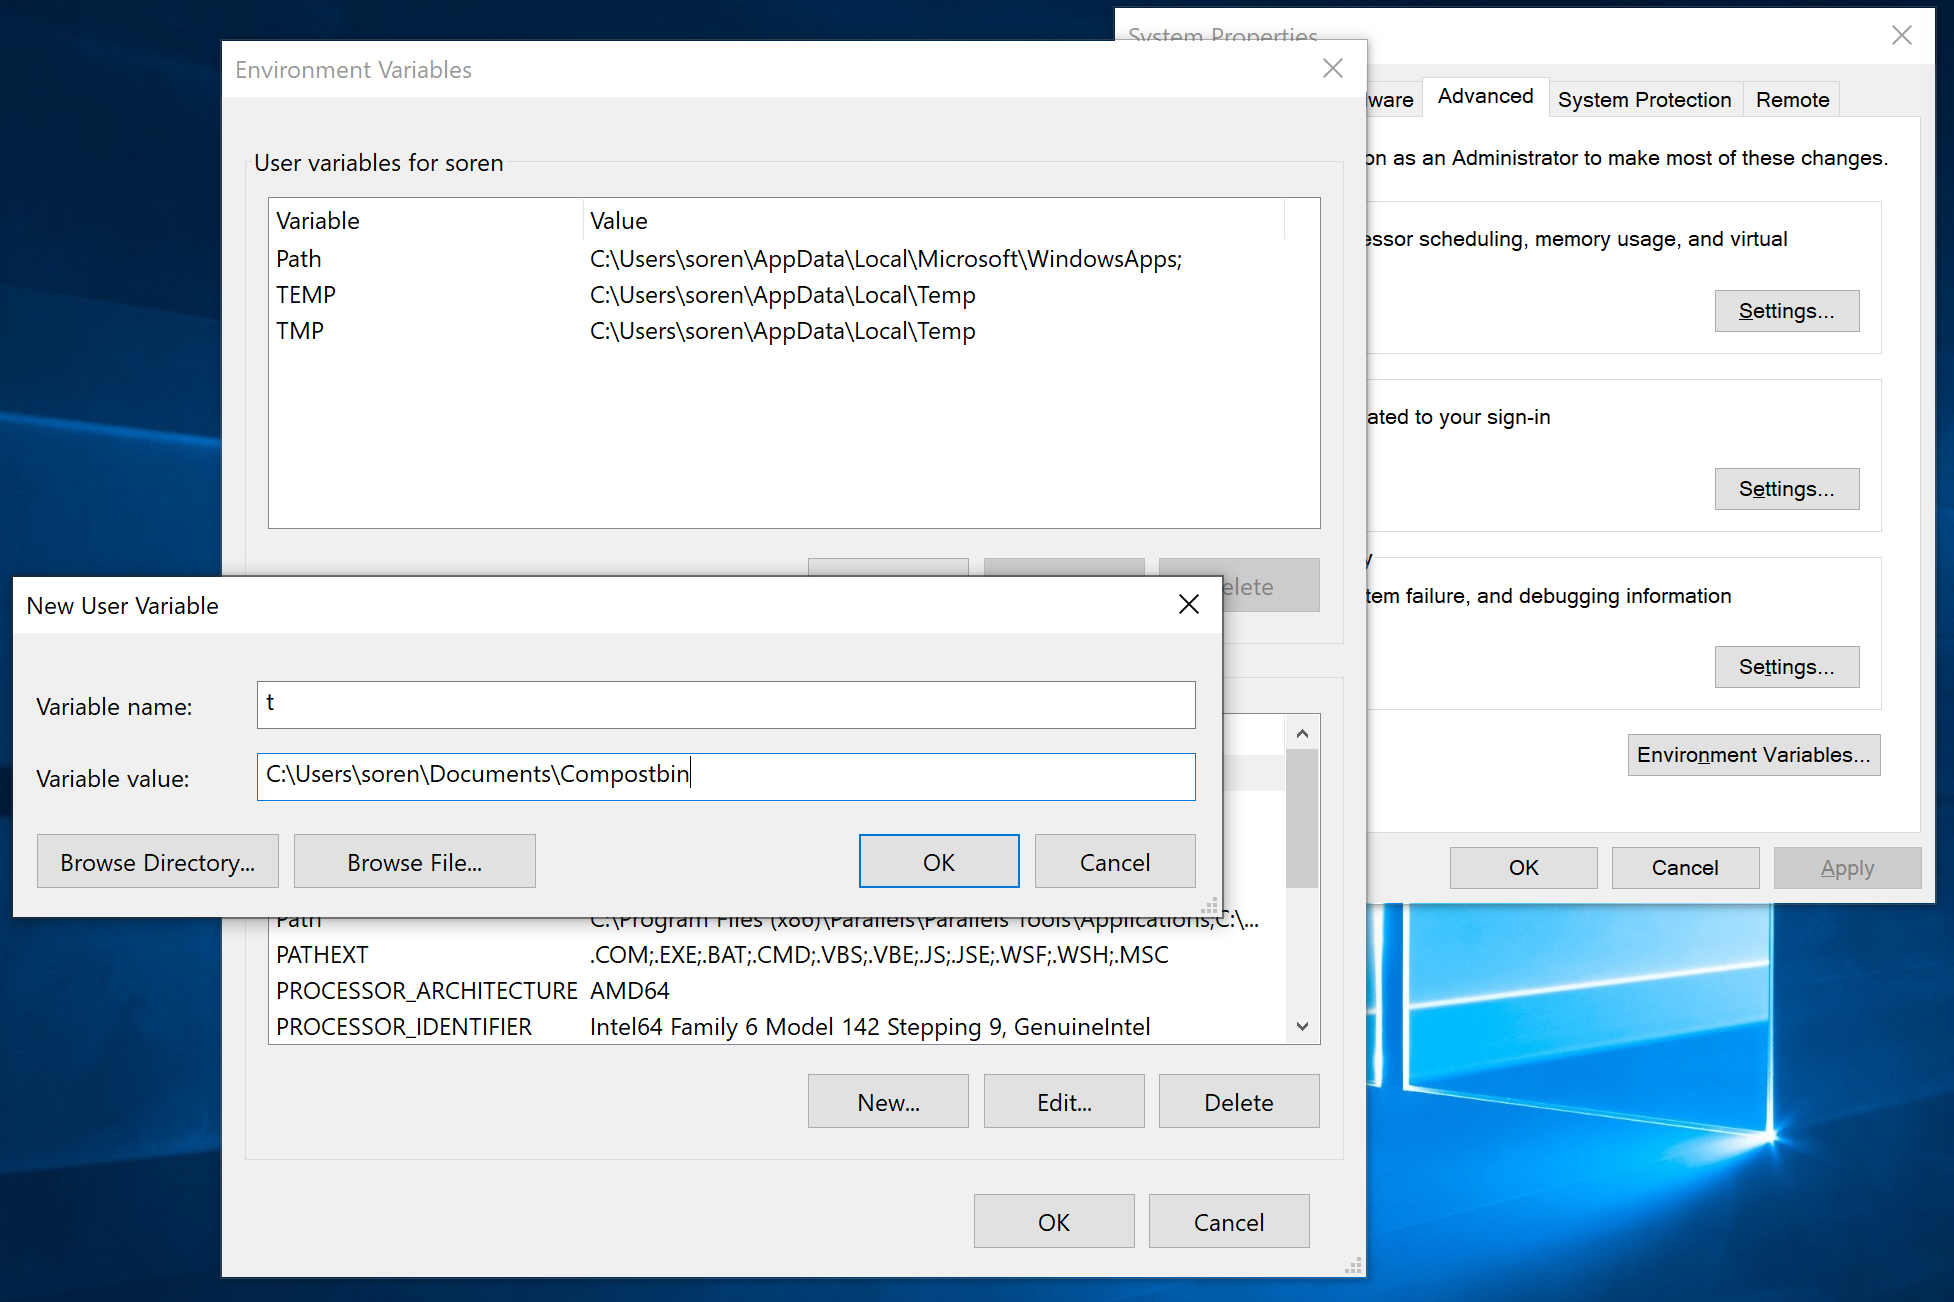
To set up a Windows environment variable: In Windows 10,
the fastest way is to hit the Start button and type
environment variable,
then choose “Edit the system environment variables.”
Click the Environment variables button at the bottom of the window.
In the “User variables” section at the top,
click New and fill in your chosen name
and the path to the folder you want to access quickly.
(If you don’t like typing long paths,
click Browse Directory and select the folder from the list.)
Note: You can use this variable
basically anywhere in Windows or another program:
in file browse dialogs,
in the Run dialog box,
in the address bar of Windows Explorer,
in other environment variables,
at the command line
(although in PowerShell you use $env:fc rather than %fc%),
or anywhere else you’re prompted for a path.
You can even use %fc%\xyz to go to the xyz folder inside the location.
Directing files into your temporary location
Once you’ve decided on a temporary location, you need to make sure everything ends up there until or unless you’re ready to file it in a permanent location. If your filesystem is currently a mess, you don’t have to clean it up all at once, but stop contributing to the mess right away. Everything goes either into its permanent location or into your temporary location.
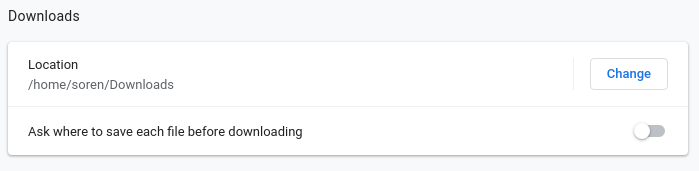
You can make saving things to your temporary location easier by encouraging programs to default to this location. For instance, when you download something from the Web, you’ll usually want it to go into your temporary location. Even if that’s not its final destination, it may be easier to put it there temporarily and then copy it out once you’ve confirmed its the file you want and decided where it should go. Every major browser has a “default download location” setting nowadays. Change it away from the nasty “Downloads” folder you can never find (am I right or am I right? When I worked at my college’s helpdesk, I lost count of how many times I helped someone find their downloads folder over the phone) and drop those downloads right into your temporary location with everything else.
In Chrome, you click the ellipsis in the far upper-right corner, choose Settings, scroll down and click the Advanced button at the bottom, and go down a couple more sections to “Downloads”, where you have an option to change the default location:
If you use a different browser, just poke around in your settings
for a minute, or go out to Google and type in
change download location Firefox/Edge/Safari/Internet Explorer 6/Netscape Navigator 2.0,
and you should be good to go.
(Okay, I couldn’t easily find any instructions
for doing this in Netscape.
Though I did find instructions on
setting up Netscape 3.x to open telnet links.
Indiana University isn’t willing to let go
of their documentation from the nineties yet.)
Keeping your temporary location clean
Obviously, you don’t want your temporary location to get so full of files you can’t find anything. Since it’s devoid of proper hierarchical organization, more than a few files will quickly become hard to look through. Therefore, try not to leave files sitting in here. Here are some examples of how to handle temporary files:
- Oftentimes, you may download or copy a file to look briefly at it and then don’t need it any more. When you’re done, just delete it.
- Other times, you may look at a downloaded file and decide you want to keep that file permanently. If you have a location in the rest of your filesystem where that file seems to belong, move it there. If you aren’t yet sure where it goes, but you’re expecting similar files to cross your path within a few days, you might leave it for now hoping that it will be easier to organize once you have a few more files. You could create a subfolder to keep those files in while you’re waiting.
- Sometimes you may need to create a file that you won’t need for long – the computer version of writing things on the back of an envelope. Drop the file in your temporary location, then delete it once you know you don’t need it anymore. If it sits for more than a few days and you still aren’t sure if you can get rid of it, it’s time to file it permanently in case you do.
Inevitably, you aren’t going to clean up every file as soon as you’re done with it. So to avoid having everything get messy again, it’s important to have a plan for a dedicated cleanup time. Some people like to clean up at the end of every day or week. Personally, I just keep an eye on how messy the folder is, and when it starts feeling cluttered I take five minutes to pick up.
